Planning Multiple Projects
Table of contents
Please make sure you’ve understood My First Project before you continue.
In this tutorial you will learn how to:
- Plan multiple concurrent projects with distinct and/or shared resources
- Re-use resource definitions on different projects
- Generate a project overview chart
- Generate individual charts for sub-projects while considering shared resources
Benefits of scheduling multiple projects
When you are planning multiple projects while having a dedicated team for each project, you most likely don’t have the need to schedule multiple projects at the same time.
As soon as some employees are involved in multiple projects in parallel, or tools/rooms/hardware are required, which have to be shared across teams and can not be used by multiple workers at the same time, things become more difficult.
Then TaskFalcon can help you to create a plan which keeps track of the availability of shared resources.
Adding a second project
Since we already have created a project plan in the first tutorial, we’re not going into the details of adding a second one. Let’s assume that the second project is going to implement a mobile application.
Similar to the last project, this requires the implementation of a backend service.
Instead of a web frontend, we now need to develop an application for mobile phones. The backend will again be developed by “Barbara Backend”, while the mobile app will be implemented by “Moses Mobile”, who will work 6 hours per day, excluding Wednesdays.
Lastly, we assume that the app development starts a week after the first project, so that both projects overlap.
Other than that, the second project looks exactly like the first project:
# File: second-project.yaml
project:
  start: 2020-06-08
  name: My First Mobile App

resources:
  - resource: BackDev
    name: Barbara Backend
    workingtime: mon, tue, wed, thu

  - resource: MobileDev
    name: Moses Mobile
    workingtime: mon:6h, tue:6h, thu:6h, fri:6h

  - filter: 1hSupportPerDay
    dailymax: 1h

tasks:
  - task: T1
    name: Software design
    efforts: 5d
    assign: MobileDev+BackDev

  - task: T2
    name: Create Backend
    efforts: 5d
    depends: T1
    assign: BackDev

  - task: T3
    name: Create Mobile App
    efforts: 8d
    depends: T1
    assign: MobileDev

  - task: T4
    name: Testing
    efforts: 2d
    depends: T2, T3
    assign: MobileDev,BackDev

  - task: T5
    name: Customer Review
    depends: T4
    length: 5d
    efforts: 4h
    assign: MobileDev.1hSupportPerDay

  - milestone: M1
    name: Delivery
    depends: T5
We can now run TaskFalcon on the second project file:
# Terminal
> falcon -show-closed-tasks second-project.yaml
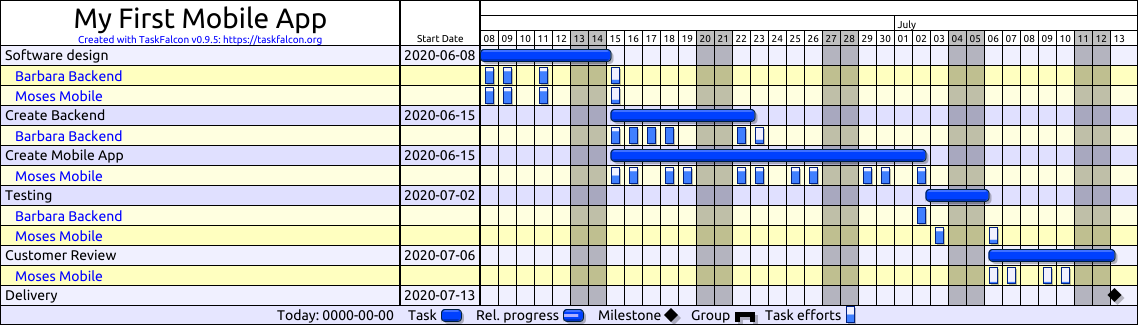
The result will look like this:
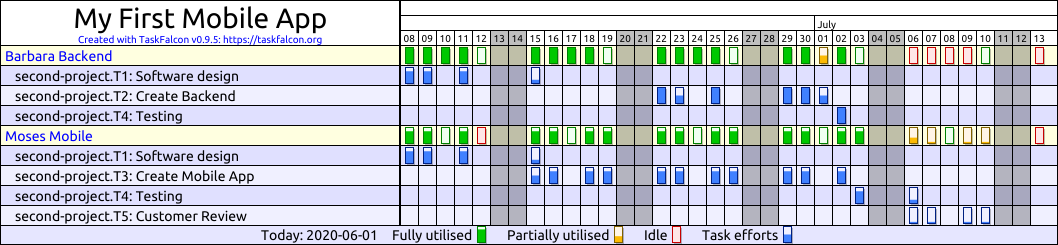
second-project.gantt.png:

second-project.gantt-with-resources.png:
Re-using resource definitions
Now we have two projects, where each project has its own definition of resources.
This approach is perfectly fine and TaskFalcon supports this, even if you are going to plan multiple projects with overlapping resource definitions.
But imagine you need to plan 10 or more projects, which all will be done by the same set of people. Wouldn’t it be much nicer to have a separate resource definition and use it from all projects?
Let’s just create a separate file with just resources and call it resources.yaml.
# File: resources.yaml
resources:
  - resource: BackDev
    name: Barbara Backend
    workingtime: mon, tue, wed, thu

  - resource: FrontDev
    name: Freddy Frontend
    dailymax: 4h

  - resource: MobileDev
    name: Moses Mobile
    workingtime: mon:6h, tue:6h, thu:6h, fri:6h

  - filter: 1hSupportPerDay
    dailymax: 1h
Now let’s change first_project.yaml and second_project.yaml to import the contents of this file.
For this, we are using the import statement, which will import resources, tasks and updates from other files. Since resources.yaml only lists resource definitions, it will only import those, of course.
# File: second-project.yaml
project:
  start: 2020-06-08
  name: My First Mobile App

imports:
  - resources.yaml        # Imports resources, tasks and updates from a separate file
                          # If this file is in a different folder, you need to specify
                          # the relative path to the target file

tasks:
# not showing task definitions, since they're the same as above
Now you do the same on your first-project.yaml from the previous tutorial
# File: first-project.yaml
project:
  start: 2020-06-01
  name: My First Web App

imports:
  - resources.yaml

tasks:
# not showing task definitions, since they're the same as before
Personal advice
I would not recommend to let TaskFalcon schedule resources with 100% utilisation.
There are always planned and unplanned diversions, which will reduce the full capacity, like:
- Planned meetings (e.g. scrum meetings), which you might not want to track explicitly in your project file
- Unplanned meetings
- Supporting colleagues
- Trouble shooting sessions with customers, managers or team mates
- Technical difficulties, which slow down progress
- People getting sick
If you’re estimating efforts of a plan sincerely and honestly, I would recommend to set the dailymax setting for each resource to 1-2 hours less than the actual availability of this resource. You can always update the plan if things go faster - but escalating delays is much more unpleasant.
Importing created projects in a super-project
Now we’re already sharing the resource definitions between two projects, but the projects will still be scheduled independently.
To leverage the full power of TaskFalcon, we need to combine both projects in one big super-project.
Fortunately, we don’t need to change the original project files or join the contents manually. The original files will remain as they are and you can keep editing them independently of each other.
To combine the two projects, we are going to create a third project, which will just import the first two projects. We will name this file all-projects.yaml.
# File: all-projects.yaml
project:
start: 2020-06-01
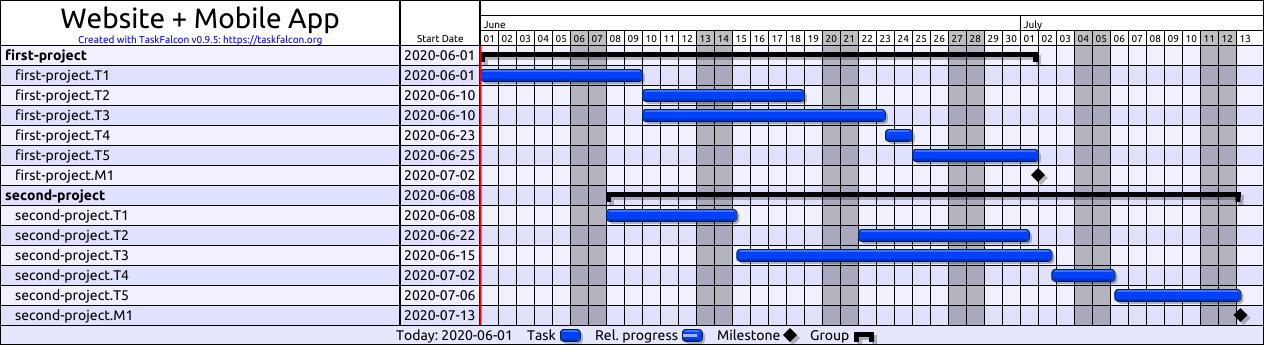
name: Website + Mobile App
imports:
- first-project.yaml
- second-project.yaml
Now we can run TaskFalcon on the new project file:
# Terminal
> falcon -show-closed-tasks all-projects.yaml
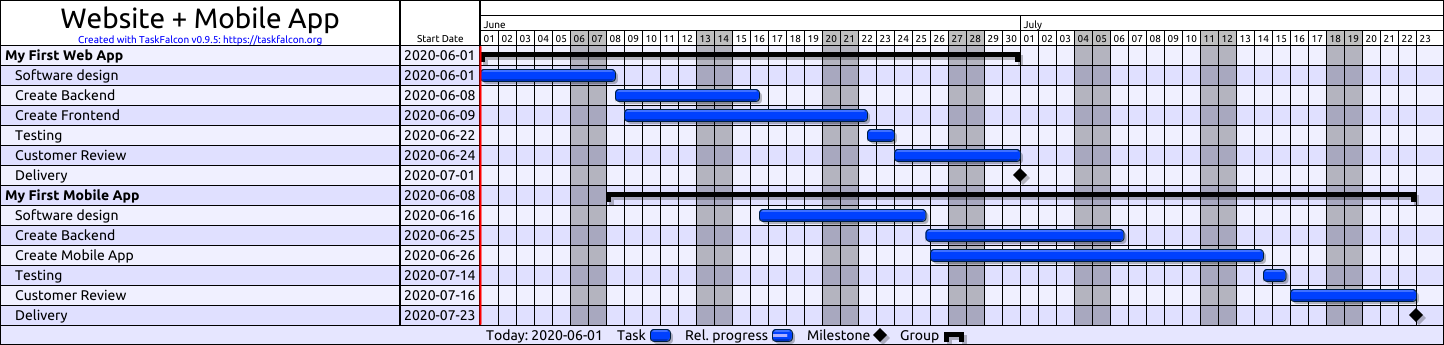
TaskFalcon will now gather all tasks and resources from both import files and merge them together in one project.
It will also create a new group as a container for each project and determine the name and start date from the project definition of the imported files.
all-projects.gantt.png:
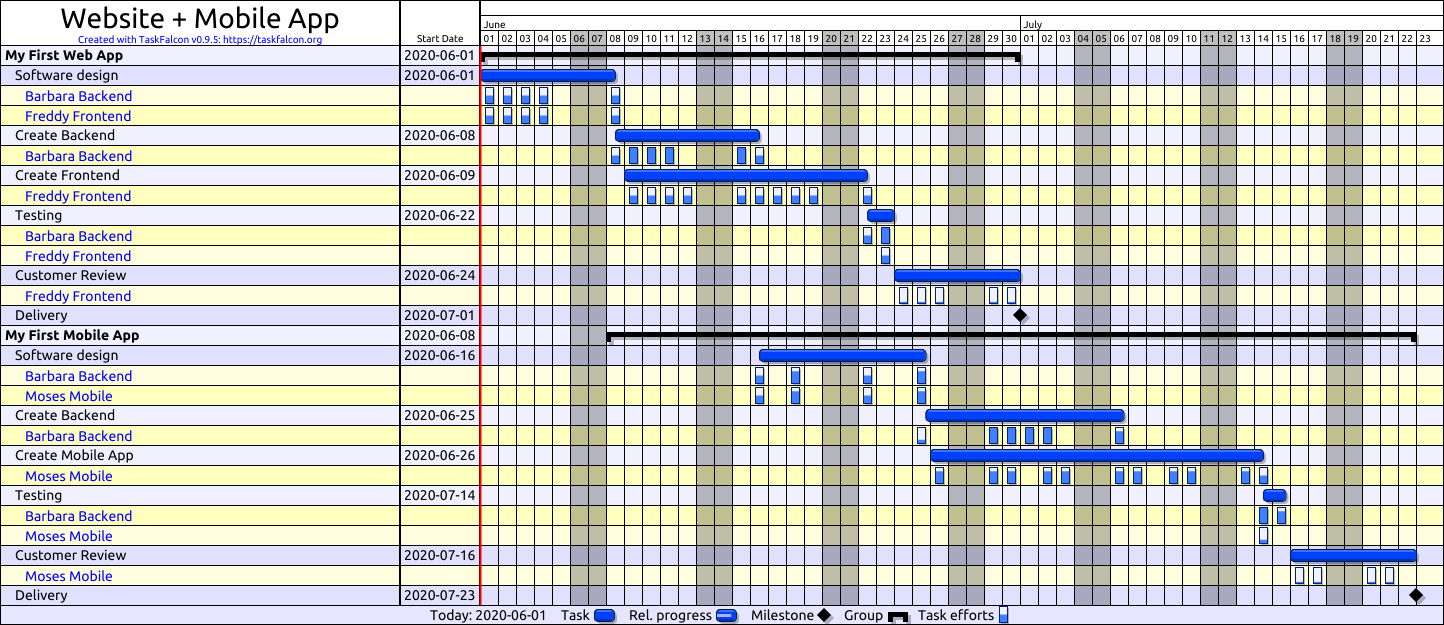
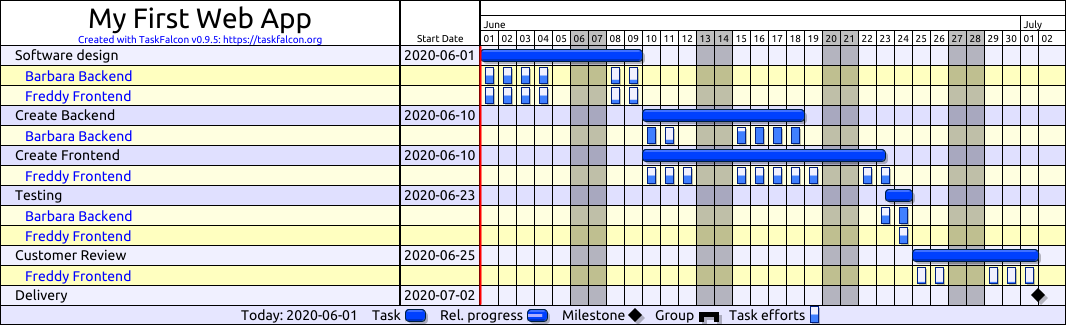
first-project.gantt-with-resources.png:
Tweaking projects to meet deadlines
Let’s assume that we have the same customer for both, web app as well as the mobile app. Their project manager just told us they want to start testing their new website and mobile app on the 13th of July. So they don’t mind a delay of the website, which currently would be done by first of July, as long as website and mobile app can be delivered on 13th of July.
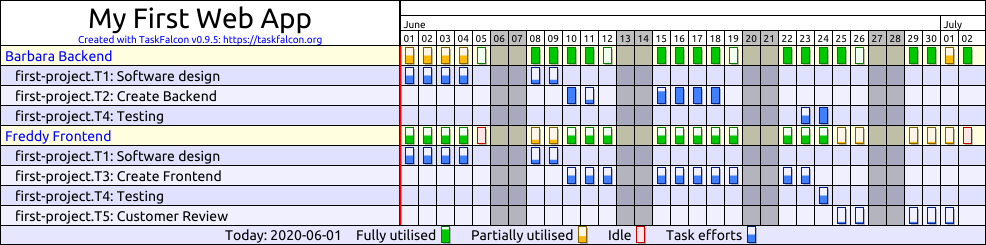
As we can see in our current plan - the mobile app wouldn’t be done before 23rd of July. When looking at the gantt chart with resources, we see that a lot of time is wasted in the design phase of the mobile app, due to the fact that “Barbara Backend” is blocked by the development of the website backend, so the design phase will only start on 16th of June.
Here we can tell TaskFalcon to give the design phase a higher priority. This will make this task more likely to get the required resources. See the documentation of priority for more details.
Let’s make the following change in the second-project.yaml file:
# File: second-project.yaml
tasks:
  - task: T1
    name: Software design
    priority: 200               # Explicitly gives this task a high priority
    efforts: 5d
    assign: MobileDev+BackDev
After scheduling the project again, we get those results:
all-projects.gantt.png:
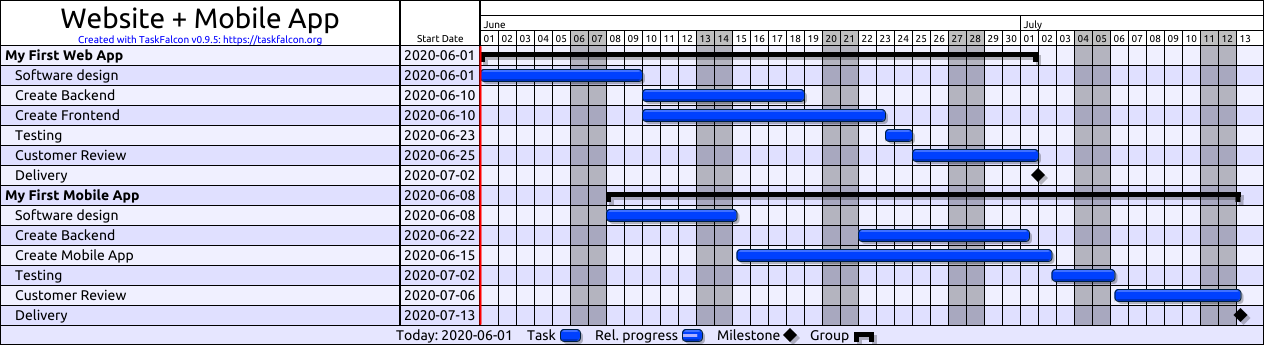
first-project.gantt-with-resources.png:

Awesome. Seems like now we can deliver both apps on 13th of July.
(Yeah, I know this looks staged. Well - it is. But keep in mind that this tutorial is just about teaching you the concepts of TaskFalcon - not about realistic scenarios :-))
Creating overview charts
In order to reap the benefits of combined scheduling, you need to run TaskFalcon with a combined project file.
However, it might be undesirable to see all the tasks of your plan with 20 projects and 800 tasks in one huge gantt chart.
But to see if everything is on track, it is still nice if there was a reduced overview gantt chart.
TaskFalcon provides a couple of command line options to create overview charts.
You can find more details on the command line overview page.
GANTT chart without tasks
By using the option -no-tasks, TaskFalcon will strip all tasks from your project chart. But it will still show groups and milestones. Let’s see how this looks:
# Terminal
> falcon -show-closed-tasks -no-tasks all-projects.yaml
all-projects.gantt.png:

all-projects.gantt-with-resources.png:

In this example, we only see the top level items, since we didn’t use groups inside the projects to organise the task tree hierarchically.
If you have more groups on deeper levels, you can use the command line option -max-depth <number> to limit the maximum depth of the task tree on the gantt chart.
# Terminal
> falcon -show-closed-tasks -no-tasks -max-depth 0 all-projects.yaml
Creating charts for sub-projects
We now have a good overview over all projects. But what if the sub-projects were contributed by different people and they are not particularly interested in other projects?
For this scenario, you can tell TaskFalcon to schedule the full project, but only render a subset of tasks.
Before we can do this, we need to understand how task IDs are calculated.
Each task in the YAML file starts with a unique identifier. If you are using groups to structure your tasks hierarchically, those groups will also have unique identifiers. By concatenating all those identifiers (separated by a ‘.’), you will get the fully qualified ID of a task.
See Task/Milestone/Group on the task configuration page for more details.
When you import other projects into a combined project file, TaskFalcon will create a new group for each imported file.
This group will be given the name of the imported file (e.g. second-project, if it was imported from a file with the name second-project.yaml).
You can ask TaskFalcon to show you an overview of those IDs by using the command line parameter -show-ids to display the fully qualified identifiers instead of task/group names.
# Terminal
> falcon -show-closed-tasks -show-ids all-projects.yaml
all-projects.gantt.png:
If you want to show only a subset of the tasks, you can use the -prefix <name> command line argument. It will only show tasks on the chart, whose IDs begin with the given prefix. However, it will still use all projects and tasks for proper scheduling.
# Terminal
> falcon -show-closed-tasks -prefix second-project all-projects.yaml
all-projects.gantt.png:

There is another convenience command line parameter to simplify rendering gantt charts for each of the imported sub-projects.
The parameter -sub-projects will render one set of charts for each sub project. However it will not render charts for the main project file itself:
# Terminal
> falcon -show-closed-tasks -sub-projects all-projects.yaml
Loading 'all-projects.yaml'
Loading './first-project.yaml'
INFO: Importing resource 'BackDev' from 'first-project.yaml'
INFO: Importing resource 'FrontDev' from 'first-project.yaml'
INFO: Importing filter '1hSupportPerDay' from 'first-project.yaml'
Loading './second-project.yaml'
Loading './resources.yaml'
INFO: Importing resource 'BackDev' from 'resources.yaml'
INFO: Importing resource 'MobileDev' from 'resources.yaml'
INFO: Importing filter '1hSupportPerDay' from 'resources.yaml'
INFO: Resource 'BackDev' already exists in parent file. Discarding resource from 'second-project.yaml'
INFO: Importing resource 'MobileDev' from 'second-project.yaml'
INFO: Filter '1hSupportPerDay' already exists in parent file. Discarding filter from 'second-project.yaml'
Finished scheduling on 2020-07-13 00:00:00 +0000 UTC

Exported chart to 'first-project.gantt.png'
Exported chart to 'first-project.gantt-with-resources.png'
Exported chart to 'first-project.resources.png'
Exported chart to 'first-project.resources-with-tasks.png'
Exported chart to 'second-project.gantt.png'
Exported chart to 'second-project.gantt-with-resources.png'
Exported chart to 'second-project.resources.png'
Exported chart to 'second-project.resources-with-tasks.png'
Final results for the project “My First Web App”:
first-project.gantt.png:

first-project.gantt-with-resources.png:
first-project.resources.png:

first-project.resources-with-tasks.png:
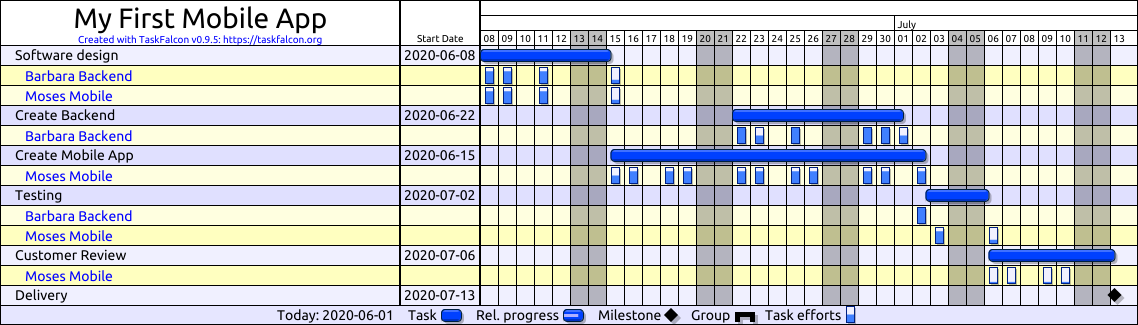
Final results for the project “My First Mobile App”:
second-project.gantt.png:

second-project.gantt-with-resources.png:
second-project.resources.png:

second-project.resources-with-tasks.png:
Well done!
You are now (on the way to become) a master of multi-project planning.
In the next tutorial we will cover the art of tracking projects.